Messenger app only working on WiFi?

I’m a huge fan of the Telegram Messenger. I’ve been using it for a couple of months now and it’s nothing short of amazing. I have it installed in almost every device I use. I kept trying to get Randy and Chanux to switch to using it and even managed to finally get Chanux to set it up on his android but I don’t see him using it much. Randy kept disappointing me as he usually does these days and simply refused to try it (he also refused to watch Star Wars, so yes, my dear Internet, I think we can safely give up on the guy now).

Never_seen_Star_Wars

Anyways I didn’t really write this blog post only to talk about Randy and his awful tastes. About a week ago I noticed that Telegram stopped working in the background while on mobile data and only started working while I’m connected to WiFi. This was really annoying because more than a couple of times I missed all my messages while on the road only to realize that Telegram was offline during my travels. When I get back on WiFi Telegram would notify me about all the messages that I didn’t receive during the day.

This obviously looked like a problem with my data settings that would restrict Telegram from using any mobile data and to my surprise it was all set to normal. Then I thought it was a restriction from the Power saving mode in android and that was also not the case.

A quick search on google led me to a bunch of forums that showed this is not just a problem with Telegram but also happens to be a problem common to a lot of apps that uses background data. And none of them seem to have solved the issue.

I kept looking through the threads and found one suggestion that finally worked for me. It was to reset all app preferences in android. This looked crazy at first but after trying everything I gave up and just did it, and guess what! Telegram now works well on mobile broadband.

So if your messenger app is not working and nothing else works you can do the following:

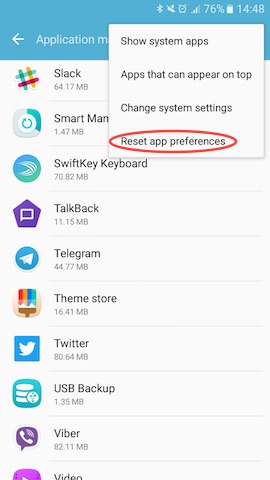
Go to Settings -> Applications -> Applications manager

Select Reset app preferences from the “MORE” menu and you’re done.

reset_app_preferences_android

Be warned though. This would reset the preferences for all the apps in your android phone. So only do this if nothing else works for you.

This trick should also fix apps like Slack, Snapchat, Viber or any other app not working on mobile data.

~SeeJay

How to Unlock the Huawei E220 HSDPA modem

The Huawei E220 (or Vodafone E220) is the HSDPA modem you usually get from Dialog Telecom or Mobitel GSM (and maybe Airtel) when you sign up for mobile broadband. Thing is, it’s usually operator-locked, so you’re stuck with one network, even when your ISP starts treating you like dirt. If you caught my last post, you know why I decided to unlock my Huawei E220 from Dialog Telecom. Here, I’ll walk you through how I did it, keeping it as simple as possible. Feel free to hit me up if you need any help.

e220

Disclaimer: I’m not responsible or liable for anything you do with this tutorial. Use it at your own risk.

Alright, with the usual “Disclaimer” out of the way, here’s what you need to do.

First, grab these tools: E220 CardLock Unlocker E220 Updater version 11.117.09.04.00 QC Mobile Analysis Tool And a hex editor, though if you do it right, a basic text editor might work too 😉

Or just download and unzip this file. It’s got everything you need, including a lightweight portable hex editor 🙂

Unlocking the E220 is as easy as running the E220 CardLock Unlock tool, punching in the unlock code, and hitting “OK.” But that’s only if you already *know* the unlock code.

unlock

So how do you figure out the unlock code? That’s where the other tools come in.

Plug your modem into your computer and run the E220 Updater. Wait for it to detect your modem, then hit the “Cancel” button. Yep, cancel it! This just preps things for the real tool to spot the modem easier.

e220UpdateNow open the QC BQS Analyzer, click the Hardware Forensics menu, and pick Use Com/USB Port. QCMob-1Now the “QC Com Diag” window should pop up. Usually, your modem and COM port are auto-selected in the Serial Com Port dropdown. If not, pick it yourself. Then hit the “Send Cmd” button and wait until “Successfully sent command” shows up in the bottom right. QCMob-2 Now select “Read EFS” from the Diag Functions dropdown and click the “Let’s go” button. When prompted, name the file e220.bin and save it. You should see a “Successfully read EFS” message. QCMob-3 Time for some hex digging 🙂 Open the e220.bin file in your hex editor. Search for the ASCII string Sd, (yep, with the comma) or the hex string 53 64 2c. After some random characters, you’ll spot a clean 8-digit code. Trust me, it stands out, and guess what? That’s your unlock code 😀 HexOnce you’ve got the unlock code, just pop it into the CardLock Unlock tool, click “OK,” and boom! your modem’s unlocked!! 😀

Hope this helps! I’d love to hear what you think. Good luck unlocking your modems 🙂 ~SeeJay

Using Huawei E220 HSDPA modem in GNU/Linux

If you’ve been following me on Twitter, you already know I got a mobile broadband connection. If not, that’s a solid reason to follow me on Twitter. Anyway! The modem I got is a Huawei E220, and I’m stoked to say it works flawlessly on GNU/Linux. I meant to write a blog post about it earlier, but I’ve been tied up with some projects alongside our local KDE dev, Siraj 🙂 (nothing KDE-related, though).

A few days ago, I came across a blog where the owner wrote about switching to GNU/Linux. One of his worries was getting his Huawei E220 to work on Linux. Sure, it’s a breeze, but I’d hate for a new Linux user to ditch it over a little hiccup with their 3G modem 😛 I left a comment on his blog, and by the time I was done, I’d basically written a full post on how to set it up. So, I figured I’d polish it up and share it here to help anyone else struggling with 3G on Linux. Here’s my mini tutorial – tweaked a bit to fit nicely.

*******************************

The E220 works perfectly with wvdial on Ubuntu Hardy Heron.
Here’s how to do it…
(1) Plug in the modem and run
sudo wvdialconf
(2) Then edit the wvdial.conf file…
sudo vim /etc/wvdial.conf Uncomment the Username and Password lines in wvdial.conf and add this to the end: “stupid mode = yes
(3) Save the wvdial.conf file
(4) Run wvdial to connect 🙂

If you’re on Ubuntu 8.10, the Graphical Network Manager picks up the modem and hooks you up in seconds.

I usually use kppp on my Slackware setup, and it works great too. I like kppp better than wvdial since it even tracks the modem’s data usage.

*******************************
That’s it, folks! If you need help, I’m just a blog comment away!.. or hit me up with an @message on Twitter. Yep, I’m the seejay over there.

~SeeJay

Wanna learn GIMP??? (!!!)

Me too!!! 😀 We’ve got to build this website for our Internet Techs & Apps module this semester, and I’m supposed to design a slick header and logo for it. Well, the whole site, really. I’ll be handling all the coding, but my group mates are killing it with gathering the data, sketching layouts, and all that jazz. That stuff’s the hardest for me, so I’m super, SUPER grateful they’re not making me deal with it.

But here’s the kicker, I’m terrible at graphic design! 😛 Well, not totally. It’s just that I haven’t had time (ugh, not that excuse again!) to mess around with it. Graphic design’s never really been my thing. I barely touched Photoshop back in my Windo$ days either… But now that I’ve got to step up for this project, I figured it’s a good chance to try out GIMP. Hoping it’s easy to pick up since I’m not hooked on those evil proprietary tools like… you know… Photoshop (yep, I said it! :D).

So, I’m scouring the web for GIMP tutorials and stumbled across some cool sites so far. I’ll stash them in my scrapbook for whenever I need them (err… scrapbook??? That’s a story for another post, hee hee…).

gimp-tutorials.net

gimp.org tutorials

YouTube GIMP tutorials

gimpguru.org

gimp-tutorials.com

OK, that’s it for now, folks! Hit me up if you know any awesome GIMP tutorial sites. I’ll keep the Links section updated as I dig up more goodies.

~SeeJay

Get Atheros 5007eg working under GNU/Linux

The Wi-Fi card in my new ASUS laptop is an Atheros 5007EG, and unlike Intel’s Wi-Fi cards, it doesn’t seem to work “out of the box” with any Linux distros 😦 You’d think MadWifi tools would fix it, right? That’s what I assumed too, until I tried it. I found tons of success stories online about MadWifi working with Atheros 5006 cards, but the 5007EG is pretty new and doesn’t seem to play nice with MadWifi yet.
After typing sudo iwconfig in the Terminal, here’s what I got…

lo no wireless extensions.

eth0 no wireless extensions.

So, I decided to try another route; using the Windows driver with “ndiswrapper.” After a few hours of tinkering ;), I got the Wi-Fi up and running 😀 The first thing that hit me was, “I’ve got to blog this so no one else wastes time figuring out how to get Atheros 5007 working on Linux!” 🙂

Here’s how I got the Atheros 5007EG working on Ubuntu. I’m also planning to write up a post for Slackware once I get some free time to test it out 😀 Alright, here’s what I did.

First, go to System >> Administration >> Restricted Drivers Manager, disable HAL, and then reboot.

Next, install ndiswrapper from Synaptic. You’ll need these three packages:
ndisgtk
ndiswrapper-common
ndiswrapper-utils-1.9

Once ndiswrapper is installed, you’ll need the Windows driver for your Wi-Fi card. I had the Atheros 5007EG driver on a DVD that came with my laptop, but if you don’t have it, you can grab the right one from the Atheros website at http://www.atheros.cz/.

Open the Terminal, navigate to the folder with your Windows driver (the .inf file) for your Atheros card, and type:
ndiswrapper -i xxx.inf (replace “xxx” with the name of your .inf file).

Now, blacklist ath_pci. Type gksu gedit /etc/modprobe.d/blacklist in the Terminal.

Add this line to the end of the file:

blacklist ath_pci

Then type ndiswrapper -l to list the installed drivers. If it’s working, you should see something like this:

net5211 : driver installed
device (168C:001C) present (alternate driver: ath_pci)

Run these commands in the Terminal, one after the other:

sudo depmod -a

sudo modprobe ndiswrapper

sudo ndiswrapper -m

Then type gksudo gedit /etc/modules, add ndiswrapper to the end of the file, and save it.

That’s it, folks! 😀 Reboot your machine, and you can check if the Wi-Fi’s working (spoiler: it is!) by typing sudo iwconfig in the Terminal. Here’s what I got after the process:

lo no wireless extensions.

eth0 no wireless extensions.

ath0 IEEE 802.11g ESSID:off/any
Mode:Managed Frequency:2.412 GHz Access Point: Not-Associated
Bit Rate:54 Mb/s
Encryption key:off
Power Management:off
Link Quality:0 Signal level:0 Noise level:0
Rx invalid nwid:0 Rx invalid crypt:0 Rx invalid frag:0
Tx excessive retries:0 Invalid misc:0 Missed beacon:0

Alright, have fun! Feel free to let me know if you run into any issues or if anything in this post isn’t clear.
~SeeJay